Chapter 6
HATS HA Special Features
HATS HA provides many special features that give the user more conveniences as well as efficiency. Read this chapter
carefully to make the most use of these features.
6.1 GUI Display of the HATS HA Main Menu
HATS HA offers a GUI display that makes it easier to use its functions visually.
- To open the HATS HA GUI main menu:
- Click anywhere on the screen background to bring up the Workspace menu.
- Click on High Availability on the Workspace menu.
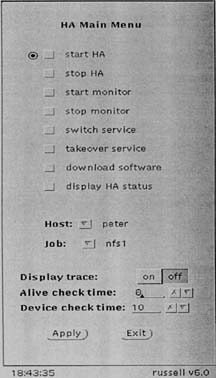
This opens the HATS HA GUI main menu as shown below:

- To use the functions on the HATS HA GUI main menu:
- Start HA:
- Click on Start HA.
- Click on host to select the hostname for your machine.
- Click on Apply.
Note:
Usually "Start HA" is automatically selected when the machine starts. However,
if the configuration is not configured properly, Stop HA
will be selected. Then
you need to modify the configuration file to correct the problems.
- Stop HA:
- Click on Stop HA.
- Click on host to select the hostname for any machine whose HATS
HA
you'd like to stop.
- Click on Apply.
Note:
- When Stop HA is applied, all its active jobs will be transferred to another machine. So, if you need to
do maintenance on a machine, you can
use theStop HA function to temporarily stop all the active jobs.
- If you set "SWITCH_BACK=yes" in the "Job Definition" section in the configuration file, you can use Start HA to bring back the active
jobs that were originally defined for this machine.
- Start Monitor:
- Click on Start Monitor.
- Click on host to select the hostname for any machine where you'd
like to view HA Status and
HA History. For example, if you are at machine A and select the hostname for machine B, the
HA Status and HA History will be displayed on machine B.
- Click on Apply to bring up the GUI display as shown below:
Notes:
- HA Status displays the initial and current status for this machine.
- At the beginning of HA History is a list of values interpreted
by HATS HA from the configuration that
you set up. Compare these values with what you set up. If you discover any different value, you
should correct it in the
configuration.
- HA History also displays a detailed record of what has transpired at this machine.
This record is also
saved in the /usr/HA/ha_file/log.<hostname>.<date> file.
- Stop Monitor:
- Click on Stop Monitor.
- Click on "host" to select the hostname for any machine where you'd like
to discard HA Status and
HA History. For example, if you are at machine
A and select the hostname for machine B, the HA
Status and HA History
will be discarded from machine B.
- Click on Apply.
- Switch Service:
- Click on Switch Service.
- Click on Job to select the job for which you'd like to change service
machines. When a job name is
selected, it will be transferred from its current
service machine to the next standby machine.
- Click on Apply.
- Take over Service:
- Click on Take over Service.
- Click on Job to select the job to change service machines. With
this function, you are asking your
machine to take over a specific job from any
other machine. For example, if you are at machine
A and select Take over Service, you are asking machine A to take over the service of a specific job
from
machine B or C, etc. One condition is that machine A must be originally configured
to be able
to service or standby this specific job.
- Click on Apply.
Note:
Take over Service can be useful in another way. For example, if you
switched a job over to another
machine before maintenance and did not set "SWITCH_BACK=yes" in the "Job Definition" section
in the configuration file,
you can use Take over Service to bring the service of the job back to
your machine.
- Download Software:
- Click on Download Software.
- Click on host to select the hostname for the machine to which you
want to download HATS HA
and its configuration from your machine.
- Click on Apply.
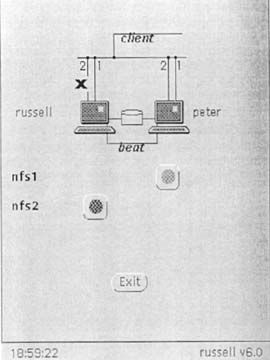
- Display HA Status:
- Click on Display HA Status. This will bring up a GUI display of
service status on your machine as
shown below.

- Click on Apply.
Note:
Each GUI Display of Service Status can only show no more than two machines and three jobs.
If more than two machines and three jobs are defined, more displays will show up on the screen.
- Display Trace:
When you select on for Display Trace, all the entries in the log file will be shown in the
Console window.
- Alive Check Time, Device Check Time, and Sync Disk Time:
- These three functions allow you to change their respective time
values on HATS HA main menu
by clicking the down or up arrow key.
- You need to adjust these time values because they affect the CPU
running time and the amount
of traffic on the network. To help you adjust the
time values for your machine, at system prompt,
type: vmstat 1. Press ENTER. This way, you can easily confirm the correct time values.
- However, after you have decided on the best time values for your machine, you need to enter
them in the configuration. HATS HA will not automatically change the time values you originally
set.

